Paid Memberships Pro is a free third party plugin that is not included with the theme. It allows you to restrict access content and features based on the users membership level. Membership levels can be assigned to a user by the admin or when the user registers and edits their profile. Membership levels can be free or require one-off or subscription payments.
Setup
- Go to Plugins > Add New and in the search box type “paid memberships pro”.
- Click Install Now and Activate for the Paid Memberships Pro plugin.
- Go to Memberships > Settings > Page Settings.
- Click the button that says Generate Pages For Me.
- Go to Memberships > Settings > Membership Levels.
- Name: The name of your Membership level (public)
- Description: Optional content shown on the checkout page.
- Confirmation Message: Optional content shown on the checkout confirmation page.
- Billing Details: For my $50/month plan, I set:
- Initial Payment (This is what is charged at checkout. E.g. $50.)
- Recurring
- $50 per 1 Month
- No payment limit
- No trial
- No expiration
- Member Homepage: This will be the users homepage is they are subscribed to this membership level.
- Content Settings: If you have any Categories that should be locked down for members, you can check them off at the bottom of the edit level page. This means that any post in a restricted/Members-Only category will be locked down for members of this level.
- Click Save Level.
Membership Levels Page
If you want to replace the default membership levels table with much more advanced pricing columns or table do the following:
- Go to Memberships > Settings > Pages.
- Find the Levels Page and click the edit page button.
- Once on the Membership Levels page remove the existing [pmpro_levels] shortcode from the text editor and then click the Edit with Elementor button.
- From the left drag and drop the PMPro Levels element into the page.
- From the Levels box select the membership levels you want to display. You can also select any featured levels which you can style differently from the Featured Levels box.
- Set the format, number of columns and spacing you want.
- Add any fields you want to display in each column by clicking the Add Item button under Fields.
- Add any comparison text you want to display in each column by clicking the Add Item button under Comparison Items.
- Under the Style tab you can change the appearance of the membership levels columns/table.
Checkout Page
Adding Sections
- Go to GhostPool Core > Site Settings and under the Settings section click Paid Memberships Pro.
- Click Add Item button under the Sections title.
- For example if you were creating a dating site you might want separate sections on the checkout page for Personal Information and Education.
- In the ID text field enter “personal_information” and in the Label text field enter “Personal Information”.
- Click Add Item again to create another section for “Education”.
Add Fields
- To add a new field click Add Item button under the Fields title.
- For example to create a date of birth field give your field an ID and Label and from Type dropdown menu select Date.
- To display it in the personal Information section you just created above, change the Location dropdown to Custom Section and enter “personal_information” in the Custom Section text field.
- From the Display dropdown option you can choose to show this field on just the Checkout page and also on the PMPro profile pages.
- Go to GhostPool Core > Site Settings and under the Theme Style section click Paid Memberships Pro.
- Under the Checkout Page toggle you can customize the appearance of the page.
If you’re also using BuddyPress you can sync the data between profile fields on your PMPro checkout/profile pages and the BuddyPress profile pages.
You may want to do this when you use the PMPro Checkout page as the registration page and use BuddyPress for user profiles. So once a user has registered any profile fields they filled out on the checkout page will also be filled out on their BuddyPress profile page.
To set this up you need to create profile fields for both PMPro and BuddyPress.
Creating BuddyPress Profile Fields
- Go to Users > Profile Fields and click Add New Field.
- Give your field a name, description (optional) and select a field type.
- Click Save.
Creating PMPro Profile Fields
- Go to GhostPool Core > Site Settings and under the Settings section click Paid Memberships Pro.
- To add a new field click Add Item button under the Fields title.
- Give your field an ID, name and field type.
- Select the matching BuddyPress field from the BuddyPress Profile Field dropdown menu.
Restricting Content and Access
Set Access Per Post
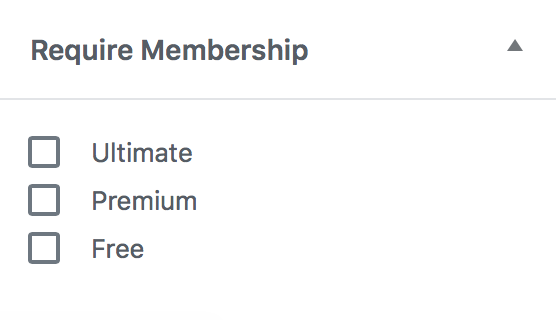
If you want to set restrictions for individual posts you can use the Require Membership box to restrict access. Note that restrictions are “cumulative” so if the post is locked at the category to membership level B, you can set it on the single post level to also include level A (in this scenario both Level A and B would have access).

Updating Posts in Bulk
If you would like to restrict many posts at the same time using the “Set Access per Post” strategy, this can be done using a MySQL query. It is very important to create a new database backup when you are doing any database work.
For more information click here.
- Go to Memberships > Settings > Levels and edit the desired level.
- At the bottom of the page you will see a section titled Content Settings.
- Check the boxes for each category that level is allowed to view.
- When users without the required membership visits a post with a category restriction, they will see the non-member or logged-out member message. These messages can be updated from Memberships > Advanced.
Elementor
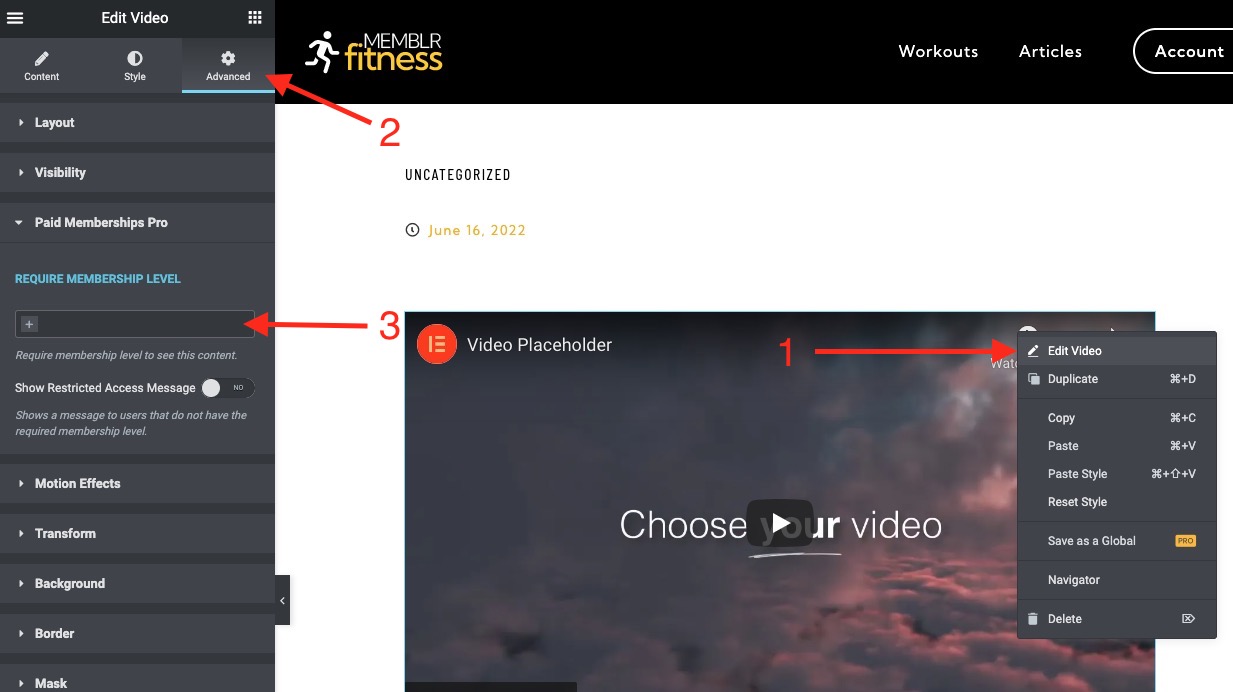
If you built a post or page with Elementor or you’re editing a theme template from GhostPool Core > Template Editor you can set any element to be hidden unless the user has the correct membership level.
- Edit the desired post, page or template with Elementor.
- From the left drag and dropped the desired element.
- Click the Advanced tab and under the Paid Memberships Pro toggle select the required membership levels to show this item.
- You can optionally show the “no access” message in place of this members content by selecting Show Restricted Access Message.

Gutenberg
If you’re using the Gutenberg editor for a post or page you can use the Membership Required block to restrict access to specific content on the page.
-
- To use this method of restricting content, insert the Membership Required block into your post or page content.
- The block has settings to choose which membership levels should have access to view the nested block content. Or, set this block of content to show for non-members only as a great way to promote your membership plans.
- If a user accessing a post does not have the required access, the entire area of content will be hidden. You can optionally show the “no access” message in place of this members content by selecting Show the ‘no access’ message in block settings.
- To restrict access to BuddyPress go to GhostPool Core > Site Settings and in the Settings section click BuddyPress.
- You can see each of the Membership Levels you created which have full access to all BuddyPress feature by default.
- To restrict access to all BuddyPress features, for a specific level select No Access.
- To restrict access to only specific features, for a specific level select Specific Access.
- You’ll then see a new option box appear, click in the box to select which features you want this level to be able to access.
- If a user does not have access to a particular BuddyPress page you can set a no access page from the Accessed Restricted Page dropdown menu.
The restricted access message can be shown when a user views a whole or part of a page they do not have access to.
Changing The Text
- Go to Memberships > Settings > Advanced and change the text in Message Settings text boxes.
Customizing The Appearance
- Go to GhostPool Core > Site Settings and in the Theme Style section click Paid Memberships Pro.
- Click the Restricted Access Message toggle to change the appearance of the message.
You can send out different emails to your users based on their membership level using the PMPro Mailchimp Add On. This also requires a Mailchimp account, so if you do not have an account you can sign up here.
- Once you have a Mailchimp account, go to Plugins > Add New and in the search box type “pmpro mailchimp”.
- Install and activate the Paid Memberships Pro – Mailchimp Add On plugin.
- Go to Settings > PMPro Mailchimp to configure your Mailchimp API Key and Audiences.