Creating Menus
Step 1: Go to Appearance > Menus to set up your navigation menus.
Step 2: Click the Manage Locations tab to view all the navigation areas in the theme. You can create a menu for each navigation area or use the same menu multiple times.
Menu Types
Step 1: Go to Appearance > Menus and add or edit an existing menu item.
Step 2: Select Mega Menu from the Menu Type dropdown menu.
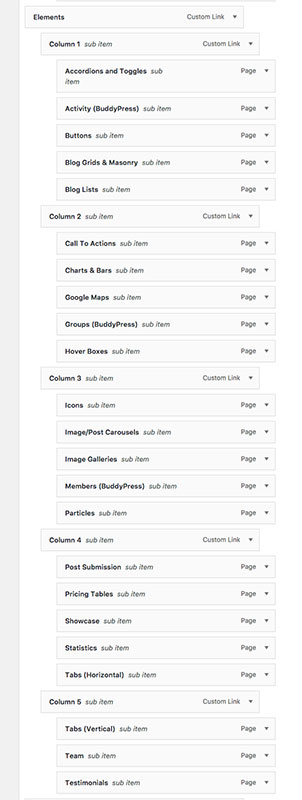
Step 3: To define each mega menu column, create/insert a menu item representing each column and then drag the menu items you want in each column inwards and underneath the parent item as shown in the image below.

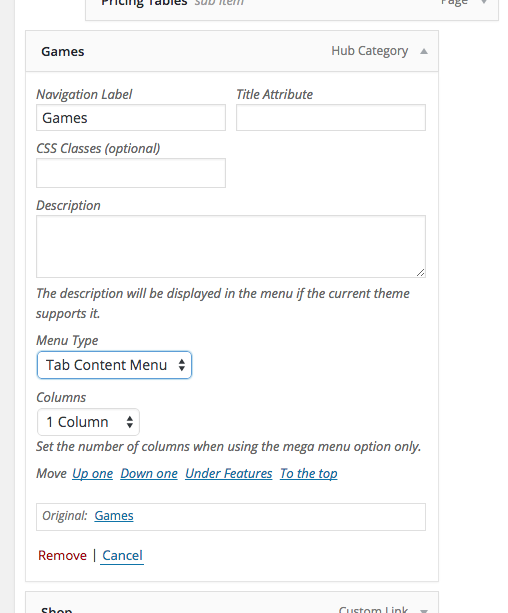
Step 1: Go to Appearance > Menus and add or edit an existing taxonomy menu item (category, tag or any custom taxonomy).
Step 2: Select Content Menu or Tab Content Menu from the Menu Type dropdown menu.

Step 1: Go to Appearance > Menus and from the Custom Links tab create a new link.
Step 2: Select Login Link, Register Link or Logout Link from the Menu Type dropdown menu.
Step 3: Set the URL to “#”, give your link a title and click Add to Menu.
Step 4: The different link types do as follows:
- A login link opens the login modal window.
- A register links open the registration modal window or redirects to the BuddyPress registration page if activated.
- A logout link logs the current user out.
Step 1: Go to Appearance > Menus and from the Custom Links tab create a new link.
Step 2: Set the URL to “#name” where “name” will be the ID of the container you want the link to scroll to.
Step 3: Select Scroll To Link from the Menu Type dropdown menu.
Step 4: Give your link a title and click Add to Menu.
Step 5: Create/edit the page you want to use the link on and add or edit a Row using the WPBakery Page Builder.
Step 6: Under the General tab give your row an ID in the Row ID text box that matches the menu URL e.g. “name”.
Step 1: Go to Appearance > Menus and create a custom link.
Step 2: Select Header from the Menu Type dropdown menu.
Step 1: Go to Appearance > Menus and add or edit an existing menu item.
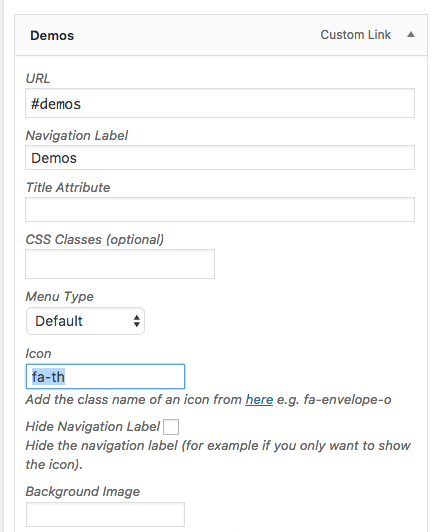
Step 2: In the Icon text box add an icon class name e.g fa-search. The full list of icon class names are available here.

Step 1: Go to Appearance > Menus and create a custom link.
Step 2: Add your text to the Navigation Label text box.
Step 3: Select Text (No Link) from the Menu Type dropdown menu.
Step 4: Give your link a title (not required) and click Add to Menu.
Step 1: Go to Appearance > Menus and create a custom link.
Step 2: Add your image URL to URL text box.
Step 3: Select Image from the Menu Type dropdown menu.
Step 4: Give your link a title (not required) and click Add to Menu.
Step 1: Go to Appearance > Menus and from the Custom Links tab create a new link.
Step 2: Select Notifications Tab from the Menu Type dropdown menu.
Step 3: Give your link a title and click Add to Menu.
Step 4: You will probably want to place the notifications tab as the top link within a submenu.
Menu Background Images
Step 1: Go to Appearance > Menus and add or edit an existing menu item.
Step 2: Add your image URL to Background Image text box.
Device Display
To control whether a menu link is shown on specific devices do as follows:
Step 1: Go to Appearance > Menus and add or edit an existing menu item.
Step 2: Select the desired option from the Device Display dropdown menu.
Logged In/Out Display
To control whether a menu link is shown for all users, only logged in or out users do as follows:
Step 1: Go to Appearance > Menus and add or edit an existing menu item.
Step 2: Select the desired option from the Logged In/Out Display dropdown menu.
Hide Navigation Title/Label
To hide the text for a menu link, for example if you just want to show an icon, do as follows.
Step 1: Go to Appearance > Menus and add or edit an existing menu item.
Step 2: Check the Hide Navigation Label checkbox.